
Inviting People to become Affiliated with your Organization

The Certification Portal (formerly Education Portal) is a recommendation platform that can also invite new people to create their myNAMI account and have it linked to your organization. This makes the NAMI National database more accurate and makes sure certifications and other permissions work across NAMI platforms. This guide walks through the entire process, including when to send an invite, how affiliations work, what recipients experience, and how to track invites after they're sent.
In this Article
- Why Send Invites
- When to Send an Invite - Invites versus Recommendations
- Navigating the Invites Page
- How to Send an Invite
- What Happens Next (Invite Accepted, Rejected, Expires)
- Limits and Cancelations
- Common Invite Errors
Why Send Invites
An Invite is the request from a Referrer to a Candidate to join your NAMI organization.
When a person accepts an invite, an affiliation record is added to their NAMI account. It also creates an account for someone who doesn't already have one.
An invite does not:
- Enroll someone in training
- Create a recommendation
- Grant a certification
- Give someone permission to act on behalf of your organization
Database accuracy
Invites help ensure that each person has one NAMI account with one associated email, even if they work with multiple NAMI organizations.
Before invites, organizations often kept their own separate records for the same person. For example, someone might volunteer with both NAMI Bumblebee and NAMI Wasp. If each organization created its own account (see former process here), NAMI’s National database could end up with two versions of the same person. Duplicate accounts are an issue because
- Contact information may become outdated in one account but not the other.
- Certifications and training history may be split across multiple accounts.
- It becomes difficult to see a complete picture of a person's involvement with NAMI.
All myNAMI accounts in NAMI’s database are identified by email address. Some users may already have multiple accounts with different email addresses. Duplicate accounts may eventually cause issues when working within NAMI platforms. If you expect this is the case, reach out to success@nami.org for support.
Benefit of ensuring someone makes their own myNAMI account
If someone wants to access various NAMI platforms or be affiliated with NAMI, they will need an account regardless if they want a certification (become a member, make donation, etc.). Some people don't know to do this on their own, but invites help get them started.
NAMI360 admins no longer have to add a new contact manually in NAMI 360 because an accepted invite does this for you. This article shows how admins were previously instructed to create an account for new members joining their organization. An affiliation record is what is listed in the “My Community - All Contacts” tab in NAMI360.
Benefit of creating an affiliation record with your organization
In addition to certifications and/or NAMI 360 access records, users must have an organization affiliation record for each affiliate they intend to work with to get proper access to NAMI platforms (NAMINet, NAMI 360/720, Certification Portal). Sometimes active Alliance staff are missing this due to historical ways of getting platform permissions.
This new affiliation record will not have a role listed in it. Without a role, the record still connects someone to your organization. This means:
- You can see them listed in the Certification Portal when creating new recommendations
- If someone is already certified, then these individuals will show up in NAMI 720 as facilitators you can choose to run events they are certified for
NAMI 360 admins will still need to add certain roles to newly certified individuals if they should have additional permissions.
Click here to review how to add them as staff, volunteers, or board members by creating a new affiliation record with a specific role in NAMI 360.
Click here to review what other records someone needs to access certain NAMI platforms
When to send an invite
Invite or recommendation?
Before you get started, decide whether you need to send an invite or a create a recommendation. Choosing the right option will save time and prevent duplicate requests.
|
|
Send an Invite |
Send a Recommendation |
|
Use it when |
You want the person linked to your organization |
You want the person to get a certification at your organization |
|
What it is meant to do |
An affiliation record for your organization A myNAMI account if the recipient doesn't already have one |
The path to a certification for them The affiliation record for the organization A myNAMI account if the recipient doesn't already have one |
|
What the person does when they get it |
Receives an email with the option to "accept" or "reject" |
Receives an email to accept the recommendation and start the requirements for the certification |
An invite connects someone to your organization. A recommendation puts someone on the path to earning a certification.
What happens when sending an invite
Below are potential conditions a recipient may have and how to approach them.
| Recipient Scenario | Context | What to do |
| Does not have a myNAMI account | Invites create an account for people who don't already have one using the email you provided. The recipient is given information on how to set up their account. | Send the invite as normal |
| Already has a myNAMI account | The Certification Portal will see that they have an account, then give it an affiliation record to be linked with your organization | Send the invite as normal |
| Already has a recommendation that is active/completed |
This person doesn't need an invite The recommendation already created an affiliate record for them |
Nothing |
| Already affiliated with your organization |
This person doesn't need an invite They already have an account and an affiliation record with you (the only two purposes of sending an invite) The invite can still be sent, but accepting the invite will not create any new connection. |
Nothing or cancel it if you sent one |
| The person is affiliated with another organization | People can be affiliated with more than one NAMI organization at the same time. If the recipient accepts the invite, they will gain an additional affiliation with your organization. | Send the invite as normal |
| I can't find my organization in the organization list | If the organization you need is not available in the list when trying to send an invite, then you do not currently have permission to send invites on behalf of that organization. | Contact your NAMI administrator if you believe you should have access. Have them contact success@nami.org for support. |
| The person already has a pending invite from another organization |
Pending invites are tracked separately for each organization. A person can receive invites from multiple organizations at the same time. For example, a pending invite from NAMI Kansas does not prevent the same person from receiving an invite from NAMI Abilene. Each organization manages its own invites independently. |
Send the invite as normal |
Navigating the Invites Page
When opening the Certification Portal, you will land on the Recommendations page. On the left-hand menu, click on Invites. Only Alliance Staff can view this page. Here is a breakdown of what is on the page:

The Invites page displays all invites you have permission to view, including invitations you sent yourself and invitations associated with organizations you can access. Each row is its own invite that includes the following:
- Email – The email address the invite was sent to.
- Organization - The organization the recipient has been invited to join.
- Role – Your relationship to the invite. For example, Referrer indicates that you sent the invitation.
- Created – The date the invite was sent.
- Expiration – The date the invite will expire. Invites remain active for six weeks from the date they are created.
- Status – The current state of the invite.
|
Status |
This means |
|
Pending |
Waiting for the recipient to respond |
|
Accepted |
The recipient accepted the invite and is now affiliated with the organization |
|
Rejected |
The recipient declined the invite |
|
Cancelled |
The invite was cancelled before the recipient responded |
|
Expired |
The recipient did not respond before the expiration date |
Finding Specific Invites
Use the filters at the top of the page to narrow the list by Status, Role, or Organization.
You can also use the Search box to quickly find invites by entering matching text, such as an email address.
How to send an invite

- Click on “New Invite" at the top right of the list (in orange box below).

- Choose the organization (sponsor) the invite comes from.
Type your organization's name into the search box, select it, and then click "Continue".

The list only shows organizations you're allowed to send invites for. If you can’t find your organization then you don’t have permission to send invites for them yet. Contact your NAMI administrator or success@nami.org for support.
- Type the person's email address and click "Continue".

To send an invite, you need to enter the person's email address manually. Before sending, it's a good idea to confirm the address with the recipient. If the email address is entered incorrectly, the invite will be sent to an invalid email; the invite will remain pending until it expires or is cancelled, which can prevent you from sending additional invites.
When creating a recommendation, you can select someone who is already affiliated with your organization. Invites don't have a list of people to choose from. That's because an invite is used to connect with someone who is not already affiliated with your organization.
- Check the summary and submit
You'll have a chance to review each step before submitting. You can click the ‘Edit’ button next to the section you want to change. Once you’ve confirmed everything is correct, click ‘Submit.’ The email goes out immediately to the person you’ve invited.

Once submitted, you can go back to the Invites page and see it entered in the invite history. This is the best place to track the progress of your invitations.

What Happens Next
After you send an invite, the recipient receives an email asking them to connect with your organization. They can either accept or decline the invitation.
Once the recipient responds, the invite's status is updated on the Invites page.
You will not receive an email or notification when an invite is accepted, declined, or expires. If you're waiting for a response, check the Invites page periodically.
The Invite email sent to the recipient
This is the email people who receive an invitation will get. The subject line is “You're invited to join your organization!” and the body is four short lines: who invited them, two links, and the expiration date.

Recipient makes their selection
The invite email includes a link to accept the invite or reject it. Both links open a plain confirmation page. Accepting or rejecting does not require the person to log in to their myNAMI account.
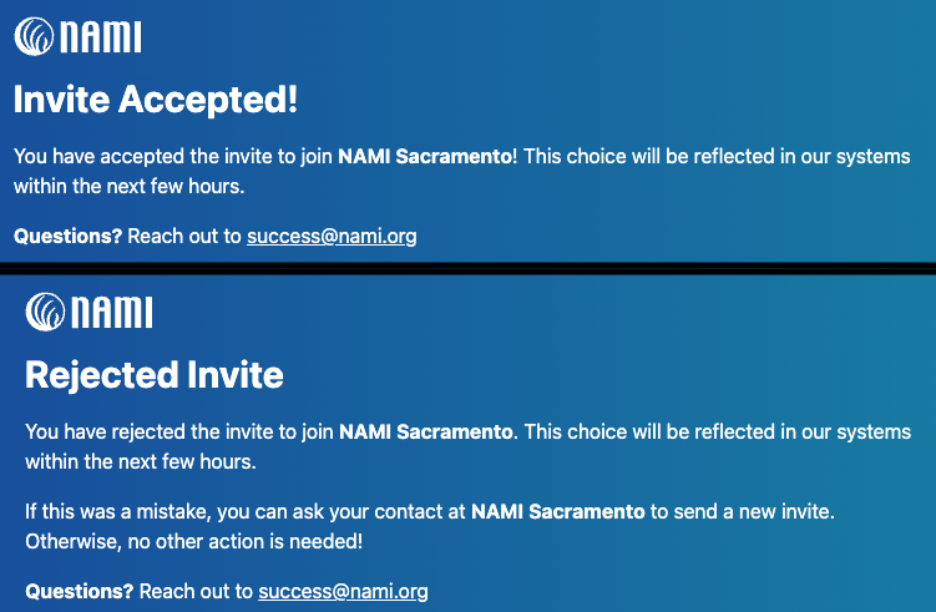
If the recipient Accepts, they become affiliated with your organization.
| Recipient myNAMI account status | What happens next | Invites dashboard update |
| Has a myNAMI account |
Their account gets linked to your organization via an affiliation record They are not prompted with a next step |
The invite status on your dashboard changes to Accepted Your organization is able to send another invite because you are one less closer to your limit of 5 pending invites |
| Doesn't have a myNAMI Account |
An account is automatically created for them. They receive an email with steps on how to set up their account |
Same as above |
If the individual accepts, be aware that it can take some time for their login and record to appear in the system.
If the recipient Rejects, then no affiliation is created.
| Recipient myNAMI account status | What happens next | Invites dashboard update |
| Has a myNAMI account |
Their account does NOT get linked to your organization via an affiliation record They are not prompted with a next step |
The invite status on your dashboard changes to Rejected Your organization is able to send another invite because you are one less closer to your limit of 5 pending invites |
| Doesn't have a myNAMI Account | They are not prompted with a next step to create an account | Same as above |
If the recipient never responds, the Invite expires. The exact date is in the Expiration column and in the invite email that the recipient receives.
| Scenario | What happens next | Invites dashboard update |
| Recipient never responds for 6 weeks after the invite was originally sent |
Their account does NOT get linked to your organization via an affiliation record They are not prompted with any next step |
The invite status on your dashboard changes to Expired Your organization is able to send another invite because you are one less closer to your limit of 5 pending invites |
Expired invites can't be extended or resent. If you still want the person to be connected to your organization, send a new invite. This is allowed as soon as the old one is no longer pending.
Invite Limits and Cancellations
Invite Limits
An organization can have five invites pending at any one time. Try to create a sixth and the Certification Portal stops you.

- Only pending invites count. Accepted, rejected, expired and cancelled ones don't.
- The allowance is per organization, counted separately. NAMI Kansas having five pending invites has no effect on what NAMI Abilene can send.
- State organizations have their own allowance. Invites sent by their affiliates don't count against them.
- Invites created by the recommendation flow count too. They come out of the same five.
How to Cancel Invites
If you're at the cap and an invite needs to go out now, you don't have to wait for one to expire. Cancel a pending invite instead, and its slot is free immediately.
- Open the row menu and click Cancel
Click the ⋮ button at the right-hand end of a pending row, then "Cancel". Confirm the cancellation by clicking "Cancel Invite", or the ✕ in the corner to back out.


Cancelling doesn't un-send the email. The message is already in the recipient's inbox; however, the link in the email will not work. If they were expecting the invite, tell them a new one is coming.
Common Invite Errors
If an invite cannot be sent, you'll see a red error message at the top of the Review step. Any information you've already entered will remain on the page, so you can make the correction and try again.
| Error | Error Message | What this means | What to do |
| This Email Already Has a Pending Invite | "This email already has a pending invite to join this organization." | An email address can only have one pending invite from the same organization at a time. |
|
|
Invite Limit Reached |
"Invite limit reached for selected organization. Please try again later or choose a different organization." | The org has reached its invite limit |
|
| Invalid Email Address | "The candidate field must be a valid email address." |
The email address entered is not valid. This doesn't account for emails that don't exists due to misspelling the first part of it, just ones that aren't a complete email format Example: sample@gmailcom |
|